Published on Dec. 18, 2020
Preparing for a good start, objectives for the brooding period
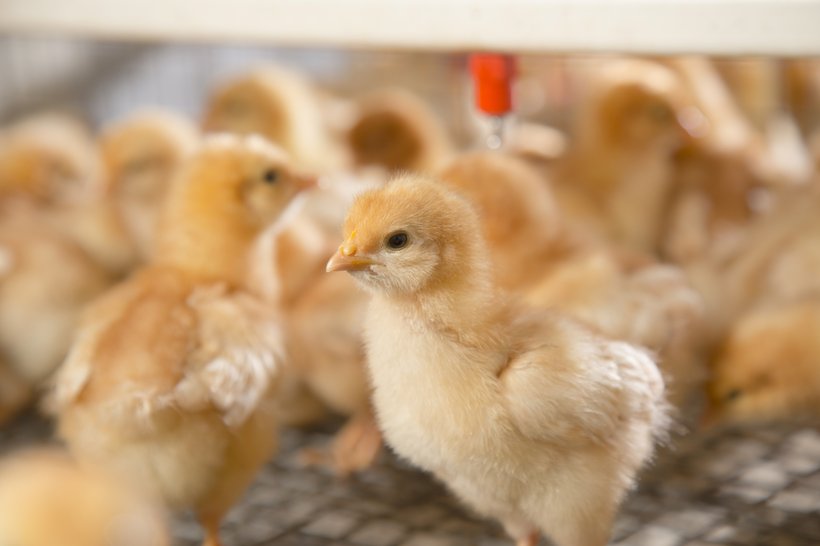
The development of the long-life layer starts before they hatch, but that’s a process which can’t be influenced by the pullet rearer or egg producer. As soon as the newborn chicks arrive at the rearing house, it is where they play a crucial in the development of the birds. The productivity of a flock depends to a large extent on the successful attainment of bodyweight targets from an early age.
The objectives during the brooding period are:
- Rapid growth to reach body weight target at 5 weeks of age
- Good uniformity from the beginning
- Excellent livability
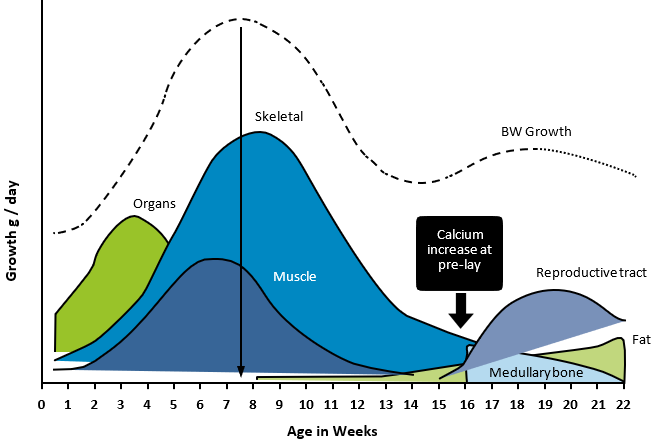
From day-old to transfer to the production house, the bird will grow slowly, and organ development occurs at various ages. A lack of growth during each of the stages could have a detrimental impact on pullet quality. Andy delay in growth at 4-5 weeks will be reflected in a reduction in bodyweight at 16 weeks and the in in performance, particularly in mean egg weight in temperate climates. Please keep in mind: two birds with the same bodyweight haven’t necessarily developed the same body composition! A rule of thumb: good growth curves result in good pullet development.
Growth can be divided in the following stages:
- The first 3 weeks are devoted to the development of the organs and the immune system.
- From week 3 to week 6, skeleton and muscles are growing. Bodyweight at 5/6 weeks is the most important determinant of pullet quality. Any delay in growth at this stage is harmful to the birds, as it will have detrimental impact on pullet quality and body composition, which will in return impact negatively the birds’ performance.
- From week 6 to 15 growth is starting to slow down
- The final stage is characterized by ovary development and rapid growth of these organs. Sexual hormonal regulation takes place around 18 weeks and leads to sexual maturity around this age
Preparing for day-old chick arrival
The success of brooding depends a lot on a good start for the chicks. Most of the chicks have travelled for quite some time and they are looking for a safe place that provides them with water, feed, a comfortable environment and a good place to rest. We have listed here the key points:
- The houses should have been cleaned, disinfected and empty for at least 14 days. The houses and its content should be dry before the new chicks come in.
- Start the heating system 24 to 36 hours before the chicks arrive (depending on climatic conditions). The brooder area and litter area should be warm enough with a constant temperature in the range of 33 – 35°C when the chicks arrive.
- Flush water lines prior to arrival of the chicks, make sure no disinfectant is left in the water lines when the chicks arrive.
- Make sure that the nipples and round drinkers are at the correct height: nipples should be at eye level of the chicks and round drinkers on the floor.
- Whatever drinking system is in use check whether the water supply is sufficient. When nipples are used, adjust the water pressure so that the chicks can see the water drop on the nipple and the water flows easily, at the lightest touch.
- If the chicks have been infrared beak treated in the hatchery, it is very important to use sideways activated nipples (360°) or nipple drinkers with cups and to use supplementary starting mini drinkers.
- Put paper under the nipples to attract the chicks and put extra feed on the paper or in cardboard trays.
- Check that all the birds, even the smaller ones, have access to feed and water.
- After a long transport duration, it is useful to wait for 3 to 4 hours before distributing feed, to make sure chicks first drink enough water to restore their body fluid.
- During the first 2 days use tepid water at 25°C to 30°C.
- In hot conditions, be careful not to let water temperature increase too much, as this may reduce the feed intake of the chicks. Regularly flush the water lines to maintain the temperature.
- Monitor the water consumption
- Avoid water spillage by the chicks as this will maintain litter quality
- Always keep the drinkers clean, for the first 2 weeks, they should be cleaned at least daily.
Keep the chicks warm
Keep in mind that during the first few days, the chicks must rely on the temperature that we maintain before their own thermoregulation starts to work properly. In order to ensure that the equipment and the litter are warm for chick arrival, it is advised starting to raise the house temperature at least 36 hours before chick arrival so that the air temperature reaches 33 to 35°C when the chicks arrive. The concrete floor must be at 28°C and the litter at 30°C. The best way to check if the house temperature is correct during the first days after arrival is to measure the cloacal temperature of the chicks (40°C). It is recommended taking the temperature of at least 20 chicks throughout the house to get a good indication of the situation. Day-old chicks cannot regulate their own body temperature, so they depend on ambient conditions. Be aware that chick body temperature reacts quickly after ambient conditions have been changed. Find the correct set point for house air temperature by managing the body temperature of the chicks. Start checking the body temperature of the chicks every hour after placement. Keep checking body temperatures until the correct temperatures have been achieved and the situation is stabilized. At day 5 the chicks will normally be able to keep up their own body temperature (within limits) and a rise in body temperature will automatically follow to about 41°C. From there on, set point for house air temperature can be gradually reduced to reach around 20°C at 5 weeks of age (e.g. 0.5°C per day).
Temperature standards are given in the table below, but again: the observation of the behavior of the flock is the best indicator of the real needs of the chicks!
- If the chicks crowd together under the brooder, the temperature is too low.
- If the chicks are close to the surround, inactive, lethargic and spreading away from the heat source, the temperature is too high.
| Brooding temperature | Brooding temperature | Room temperature | Relative humidity | |
| age (in days) |
At the edge of the brooders |
At 2-m from the brooders | ||
| 0 – 3 | 35°C | 29 – 28°C | 35 – 33°C | 55 – 60°C |
| 4 – 7 | 34°C | 28 – 27°C | 32 – 31°C | 55 – 60°C |
| 8 – 14 | 32°C | 27 – 26°C | 30 – 28°C | 55 – 60°C |
| 15 – 21 | 29°C | 26 – 25°C | 28 – 26°C | 55 – 60°C |
| 22 – 24 | 25 – 23°C | 25 – 23°C | 55 – 65°C | |
| 25 – 28 | 23 – 21°C | 23 – 21°C | 55 – 65°C | |
| 29 – 35 | 21 – 19°C | 21 – 19°C | 60 – 70°C | |
| After 35 | 19 – 17°C | 19 – 17°C | 60 – 70°C | |
At all stages flock uniformity needs to be reviewed. The objective is to have a very high uniformity in order to facilitate flock management and stimulation. Low uniformity leads to poor laying performance! The number of feeders and drinkers, feed distribution, the presentation of the feed and the farmers’ management are strong contributors to ensure uniformity. Heterogeneity ate early age has a negative impact on uniformity during transfer